
Payment setup
Connect a payment provider such as Stripe or PayPal, plus test mode and optional invoicing.
Until you set up payments, courses can only be given away for free. You'll find the settings under Settings → Payment settings.
Connect a payment provider
Pick a provider and connect your account so you can collect payments:
| Provider | Best for | Onboarding |
|---|---|---|
| Stripe | Cards and international customers | Instant online sign-up |
| PayPal | International customers | Instant online sign-up |
Providers like Stripe and PayPal let you sign up online and start accepting cards right away. Some regions also offer local providers with bank transfer and other local payment methods — those involve a business review before your account is approved.
Finish the site before you apply
The application asks for your website URL, and a reviewing provider will open that URL and check whether the site is complete. An empty shell gets rejected. So the order is build the site, then apply — not apply on day one.
Have at least this in place first:
- One published course or product, with a name, a price and a real description
- A checkout that you can actually reach
- Legal pages: terms, privacy policy, refund policy — created for you when the site opened; check they match what you actually do
- Contact details: who you are, an email address, a phone number
Your custom domain or the subdomain the system gave you both work as the URL (Custom domain).
⏱ A review typically takes several business days, so apply the moment the site is finished — not once your launch dates are already booked.
Set up payments, step by step
Step 1: Choose the payment mode
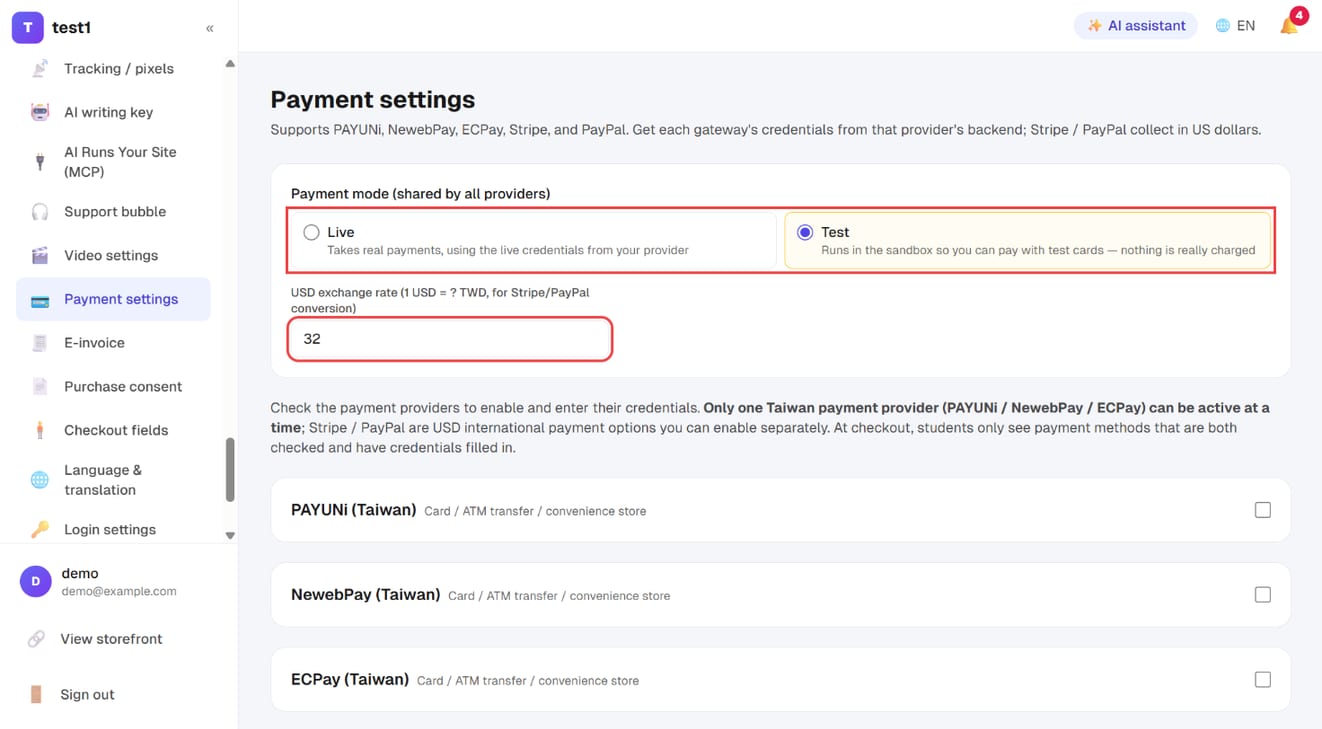
In the left menu, click "Settings → Payment settings". At the top, "Payment mode (shared by all providers)" has two options:
- Live: takes real payments, using the live credentials from your provider
- Test: runs in the sandbox so you can pay with test cards — nothing is really charged
The USD exchange rate below converts your course prices for Stripe and PayPal, which charge in US dollars.
Step 2: Turn on Stripe and/or PayPal and paste your keys
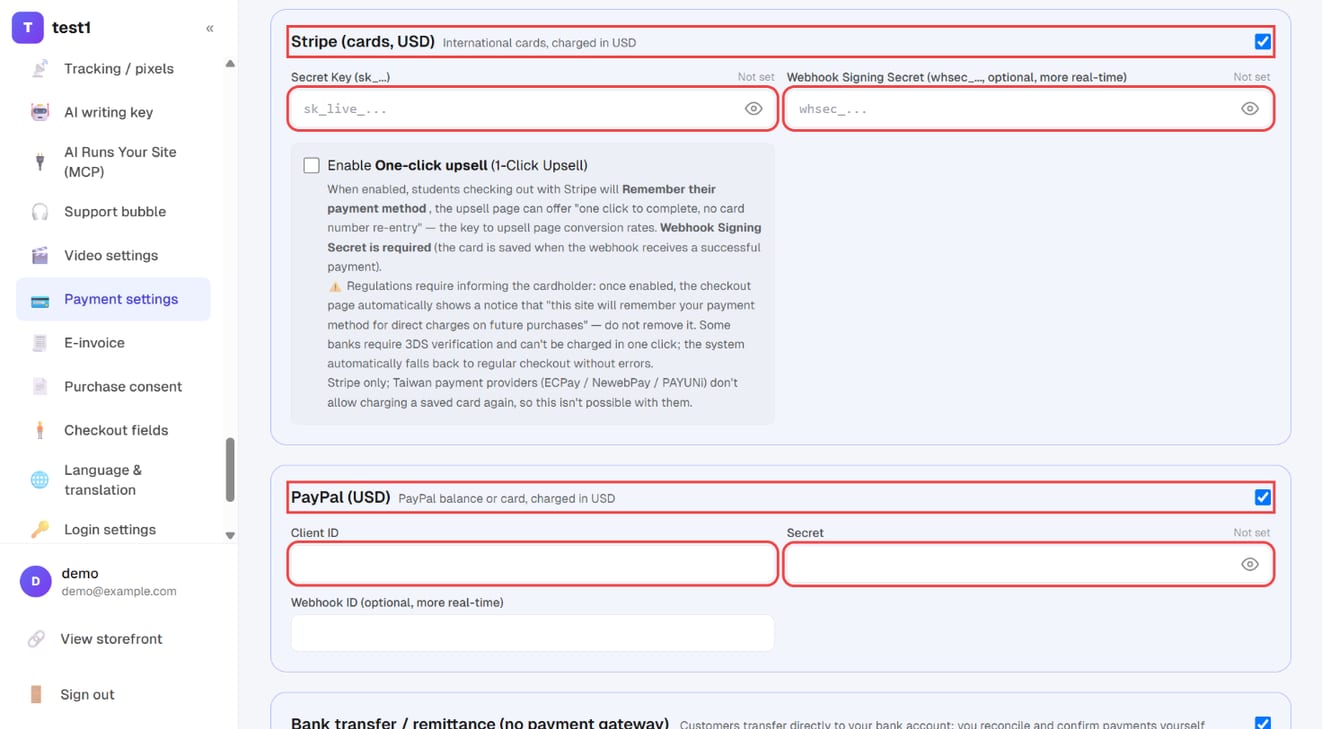
Scroll down and tick the providers you want:
- Stripe (cards, USD): paste the Secret Key (
sk_live_…, orsk_test_…while testing). The Webhook Signing Secret (whsec_…) is optional but makes payment confirmation more immediate - PayPal (USD): paste the Client ID and Secret from your PayPal developer dashboard; the Webhook ID is optional
Step 3: (Optional) Offer bank transfer, then save
Tick "Bank transfer / remittance (no payment gateway)" if you also accept direct transfers: fill in the bank name, account number and account holder, plus an optional note for customers. They'll see these details after ordering, and you mark the order as paid yourself once the money arrives. Click "Save settings" at the bottom.
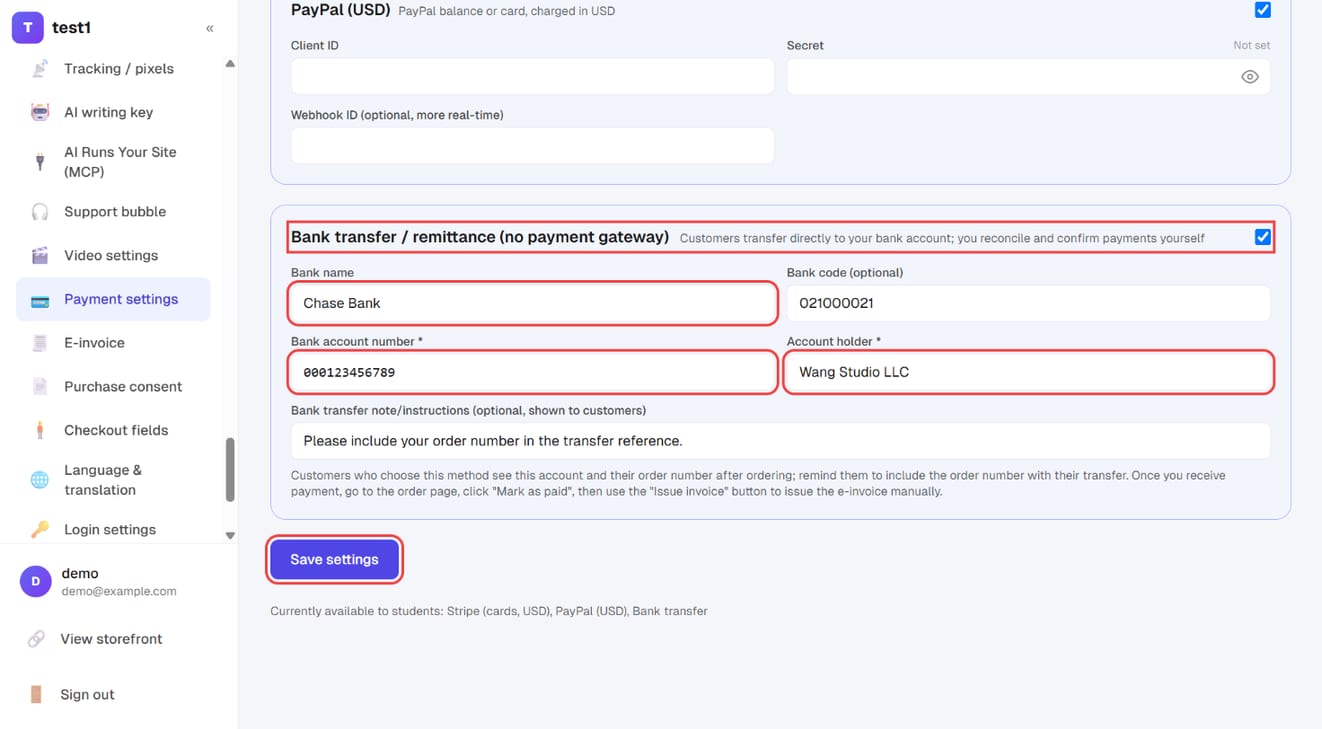
The line under the button — "Currently available to students" — lists exactly which payment methods checkout will offer. A provider only appears there once it's ticked and its credentials are filled in.
Enter your keys
You'll find the API keys in your payment provider's dashboard.
How the credential fields behave: after a key is saved we never send it back to your browser — the field shows Configured and stays empty. Leaving it empty keeps the stored key untouched, so you can change your exchange rate or switch payment methods on and off without retyping anything. Type in the field only when you want to replace a key, and use Remove next to it to clear one. (Video and e-invoice settings work the same way.)
🔒 Keys are stored encrypted in the database — never kept as plain text.
Test mode (sandbox)
"Payment mode" at the top of the Payment settings page is either Live or Test, and the choice is shared by every provider (and by e-invoicing).
- Test: payments go through the provider's test environment. You can run the whole flow with a test card and no real charge is made.
- Switch to Live before you go live, otherwise money your customers pay won't actually reach you.
⚠️ This is the easiest step to forget. Recommended: as soon as your test run works, come straight back and switch to Live, then buy your cheapest course yourself with a real card to confirm the funds land before you start promoting.
Each provider publishes test card numbers in its docs (a common test card is 4242-4242-4242-4242).
Choose payment methods
You can toggle each payment method on or off: cards, bank transfer, installments, and any other local methods your provider supports.
Installments must also be enabled per course under the course settings ("Allow credit card installments") — not every course is a good fit for installments, so it's controlled course by course.
If you sell in Taiwan, switch to the Traditional Chinese version of this page — it also covers buy now, pay later (instalments without a credit card), including which route to take and how the approval works. That option needs a Taiwanese business entity, so it isn't repeated here.
Invoicing / tax receipts (optional)
Under Settings → Invoicing you can connect an invoicing provider to issue receipts automatically after a successful payment, with support for voiding and credit notes.
If you don't set this up, the system won't issue receipts and you'll need to handle tax documents yourself.
FAQ
Payment succeeded but the course wasn't unlocked? First check Email & newsletters → Email log to see whether the notification email was sent, then check the status of that order under "Course orders". If the order is stuck on "Awaiting payment", the provider's callback (webhook) usually didn't arrive correctly — confirm the notification URL you entered in the provider's dashboard is correct.
Can I enable several providers at once? You can add Stripe / PayPal alongside a local provider, but only one local provider can be active at a time. This is deliberate — it keeps the checkout page from showing too many options and making customers hesitate.
What are the fees? The platform takes no cut. Fees are between you and your payment provider — the platform never touches the money.
Can I offer buy now, pay later? It's available for sellers in Taiwan, where an approval-based instalment option lets buyers pay over time without a credit card while you're paid in full. Switch to the Traditional Chinese version of this page for the setup steps.