
Create Your First Course
The full flow from adding a course, uploading videos, and setting prices, to publishing it live.
Creating a course takes two parts: first the course settings (name, description, price), then the teaching content (topics and lessons). Every step below comes with a screenshot of the dashboard; the red boxes show exactly where to click.
Create a course, step by step
Step 1: Create a new course
In the left menu, click "Teaching → Course", then "+ New Course" at the top right.
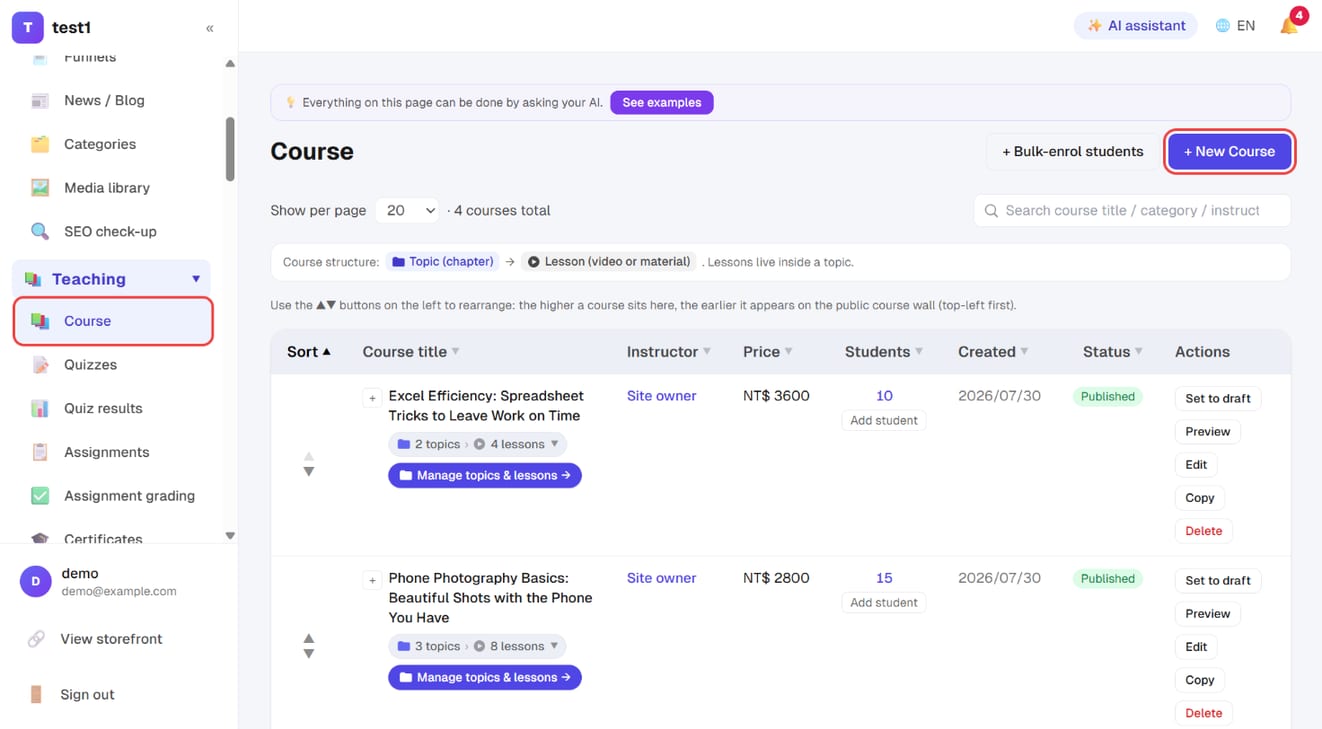
The list shows each course's instructor, price, student count and status. Use the ▲▼ on the left to reorder: the higher a course sits here, the earlier it appears on your public course wall.
Step 2: Fill in the course name, URL and category
- Course name (required): everything else can be filled in later
- Course URL (optional): leave it blank and it's generated from the course name. Want a clean English URL? Type your own, e.g.
excel-pivot - Category (optional): once set, a category bar appears above the course wall so students can filter, and a member tier can discount just one category. The same name means the same category
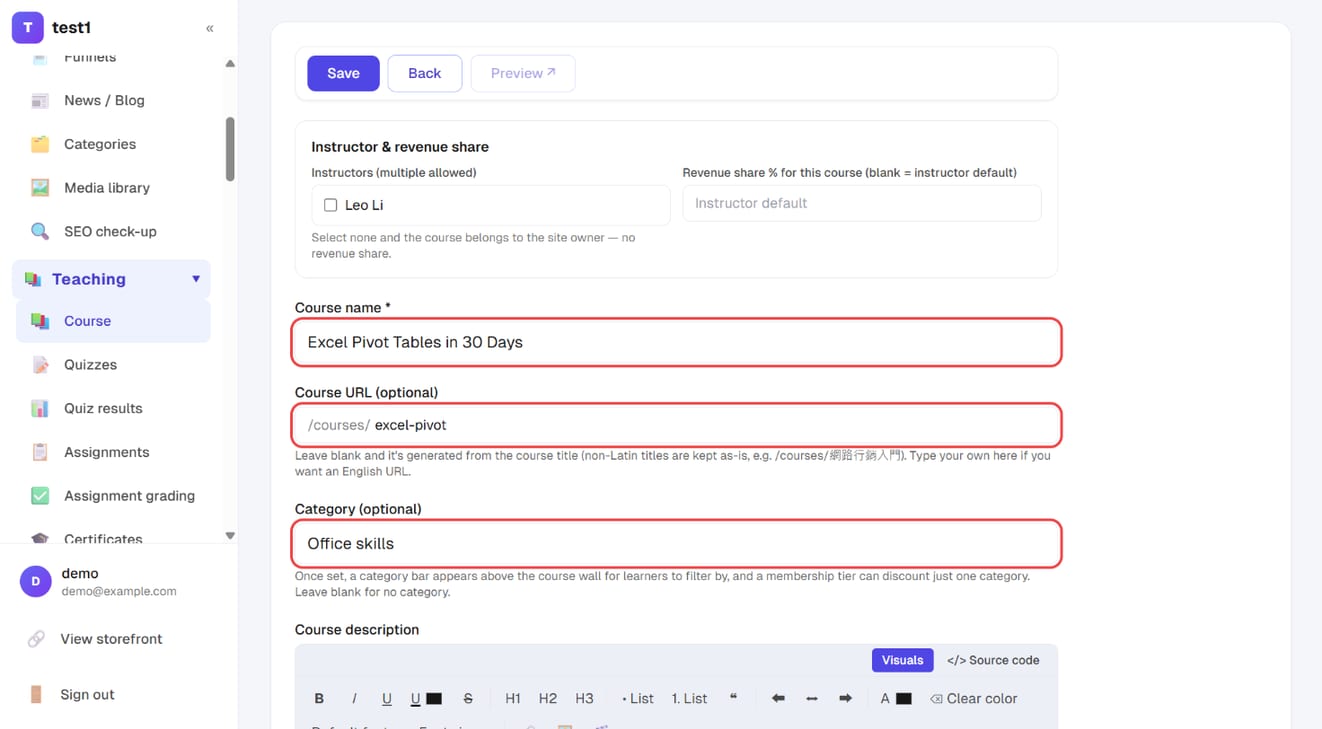
If you work with other instructors, tick them under "Instructor & revenue share" at the top. Tick no one and the course belongs to the site owner, with no revenue share.
Step 3: Write the description and add a featured photo
- Course description: shown on the course page and indexed by search engines — worth writing well
- Featured photo: click "Choose / upload featured photo". The course list, search results and link previews all use this image; without it visitors see an empty box. 16:9 works best, and it's compressed to WebP automatically on upload
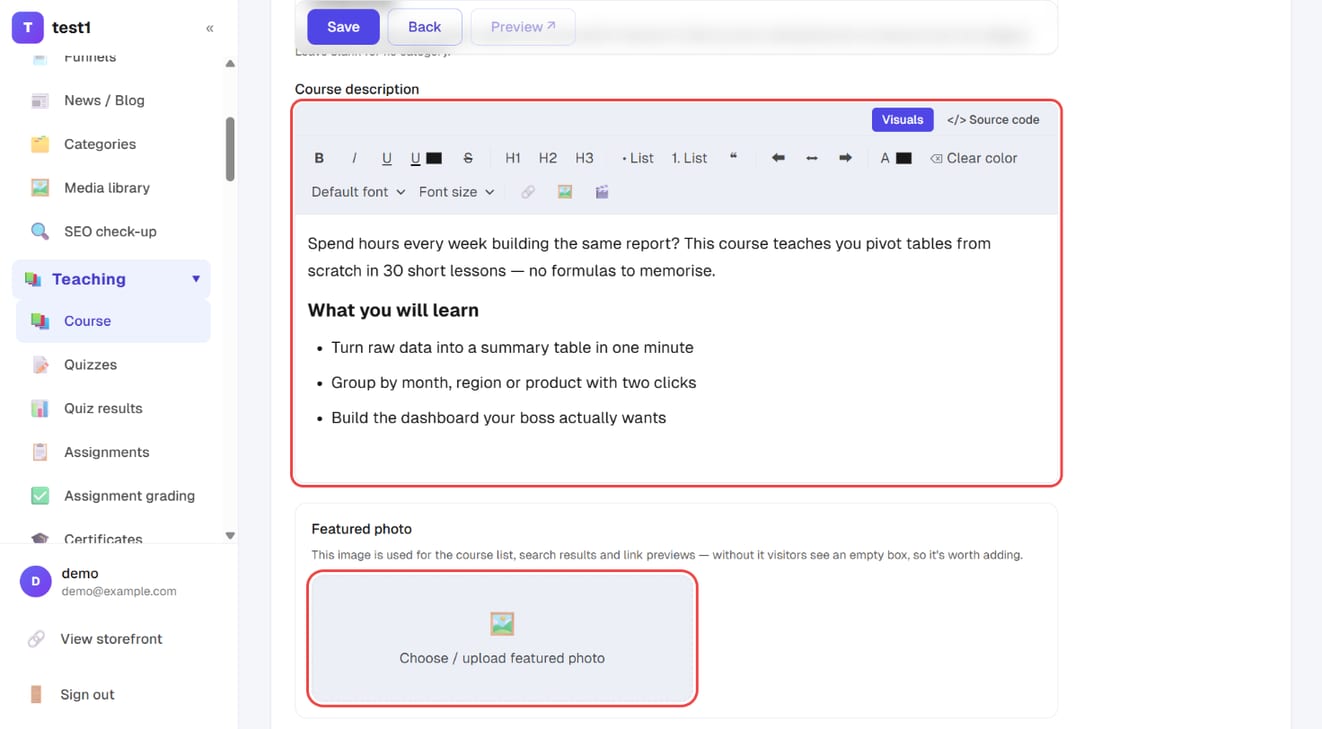
Below that, a "Course intro video" (optional) sits at the top of the course page in place of the featured photo — a good spot for a sales video.
Step 4: Choose how you charge and set the price
- How you charge: "One-time payment" or "Subscription (recurring)"
- Original price and sale price: the sale price can have an "Offer expiry date", after which the original price returns automatically
- Viewing period (days): leave blank for lifetime access
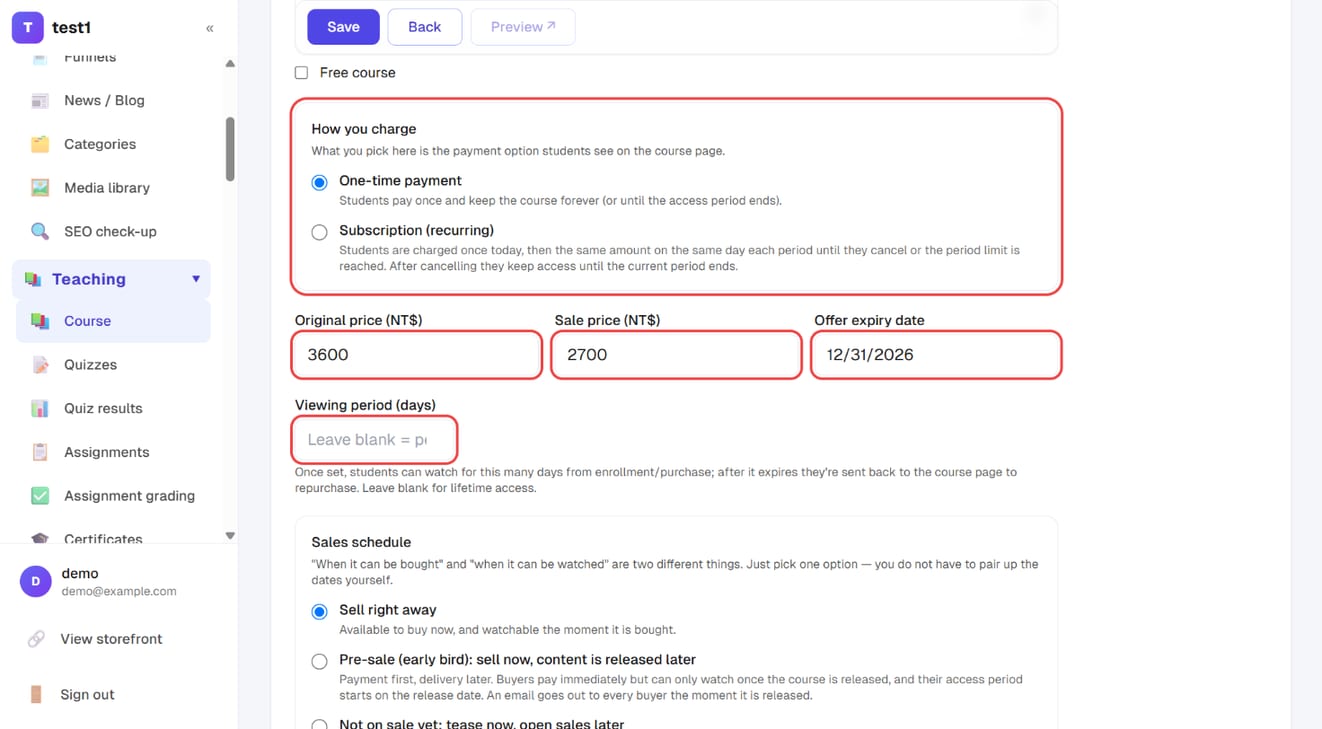
Giving a course away? Tick "Free course" above — students enrol directly without going through checkout.
The "Sales schedule" below has three options:
| Option | Best for |
|---|---|
| Sell right away | Buyable now and watchable the moment it's bought |
| Pre-sale (early bird) | Take payment now, release the content later; buyers are emailed automatically when it goes live |
| Not on sale yet | The course page shows a countdown and a "notify me" sign-up; sales open on schedule with an automatic reminder email |
Step 5: Decide whether to publish, then continue
At the bottom of the form:
- Publish now: unticked = saved as a draft only you can see; ticked = the course goes live as soon as you save
- Discontinued (no longer for sale, page kept): for an old course you no longer sell but keep for existing students
Click "Next: Set Up Topics & Lessons →" to save and go straight to the content page.
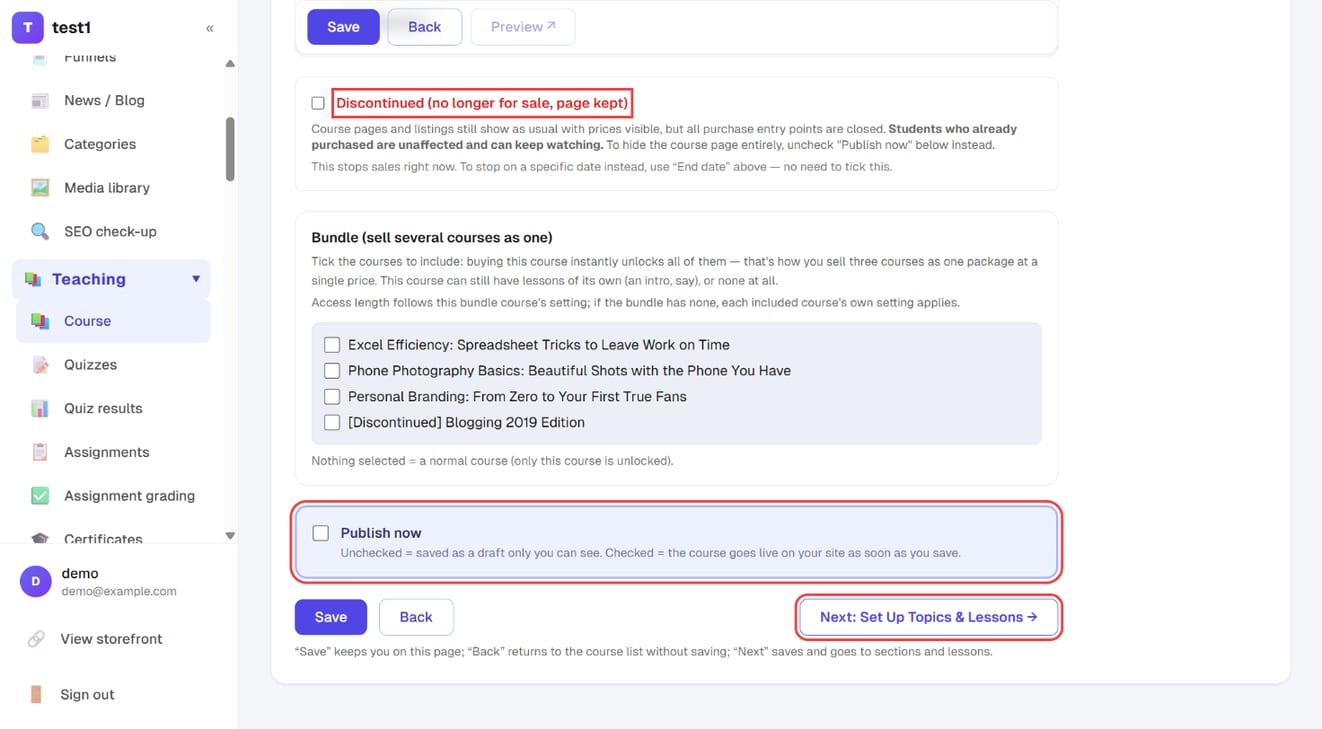
Discontinuing and unpublishing are easy to mix up:
| Course page | Existing students | Can buy? | |
|---|---|---|---|
| Discontinued | Visible | Keep watching | ❌ |
| Unpublished (untick "Publish now") | Gone entirely | Can't see it either | ❌ |
To stop sales automatically on a set date, use the "End date" in the middle of the form instead of remembering to tick "Discontinued".
Step 6: Create topics and add lessons
On the "Topics & Lessons" page:
- Topic = a chapter grouping (e.g. "Chapter 1: Cleaning up your data") — click "+ Add topic" at the top right
- Lesson = an actual lesson — click "Add lesson" under a topic
- "Add a lesson that already exists in another course" reuses a lesson from another course
- "Set as free preview" on a lesson lets visitors who haven't bought watch it — usually the first one or two lessons of chapter 1
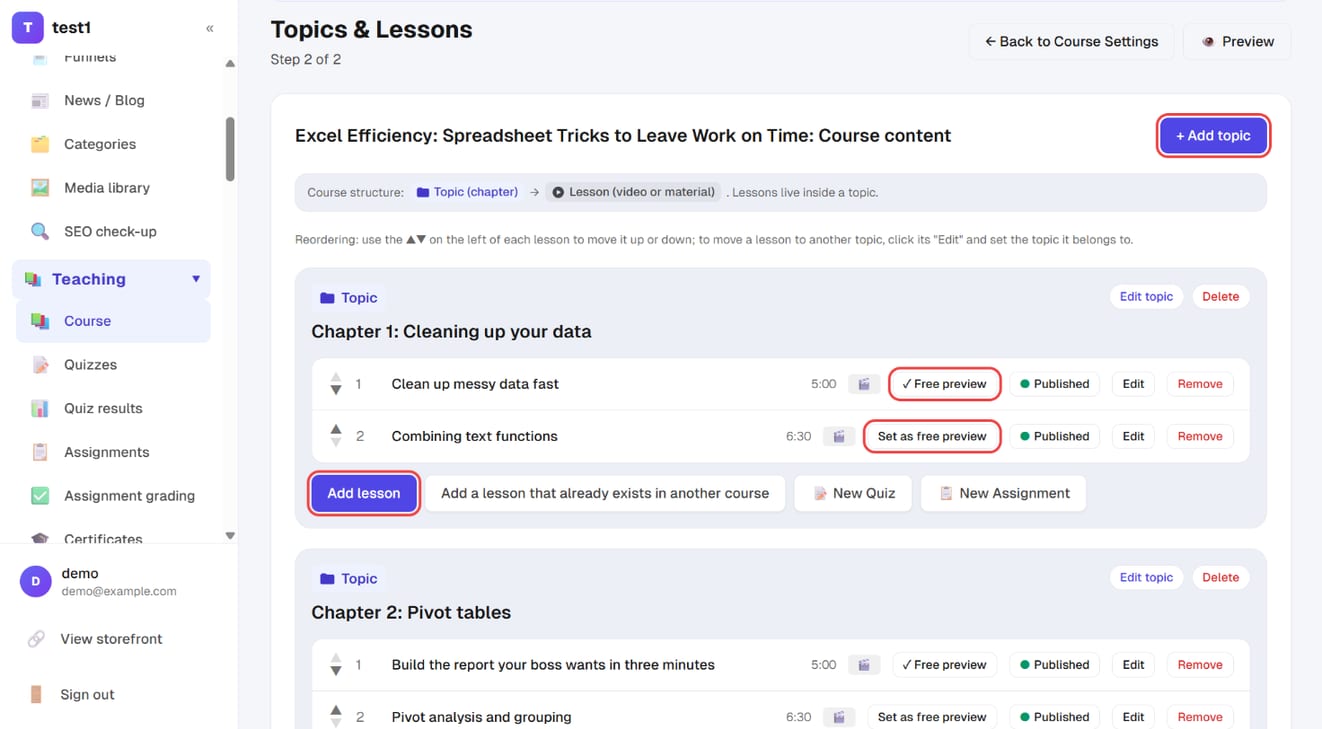
Use the ▲▼ next to each lesson to reorder. Adding, editing and reordering topics and lessons saves automatically.
Step 7: Edit a lesson and add its video
Click "Edit" on a lesson (or "Add lesson") to open the editor:
- Lesson name
- Lesson content: text and images
- Video source: YouTube and Vimeo — paste the URL; Bunny and Cloudflare Stream — upload the video file directly
- Video length: can be left blank — it's detected and filled in automatically once a student plays it
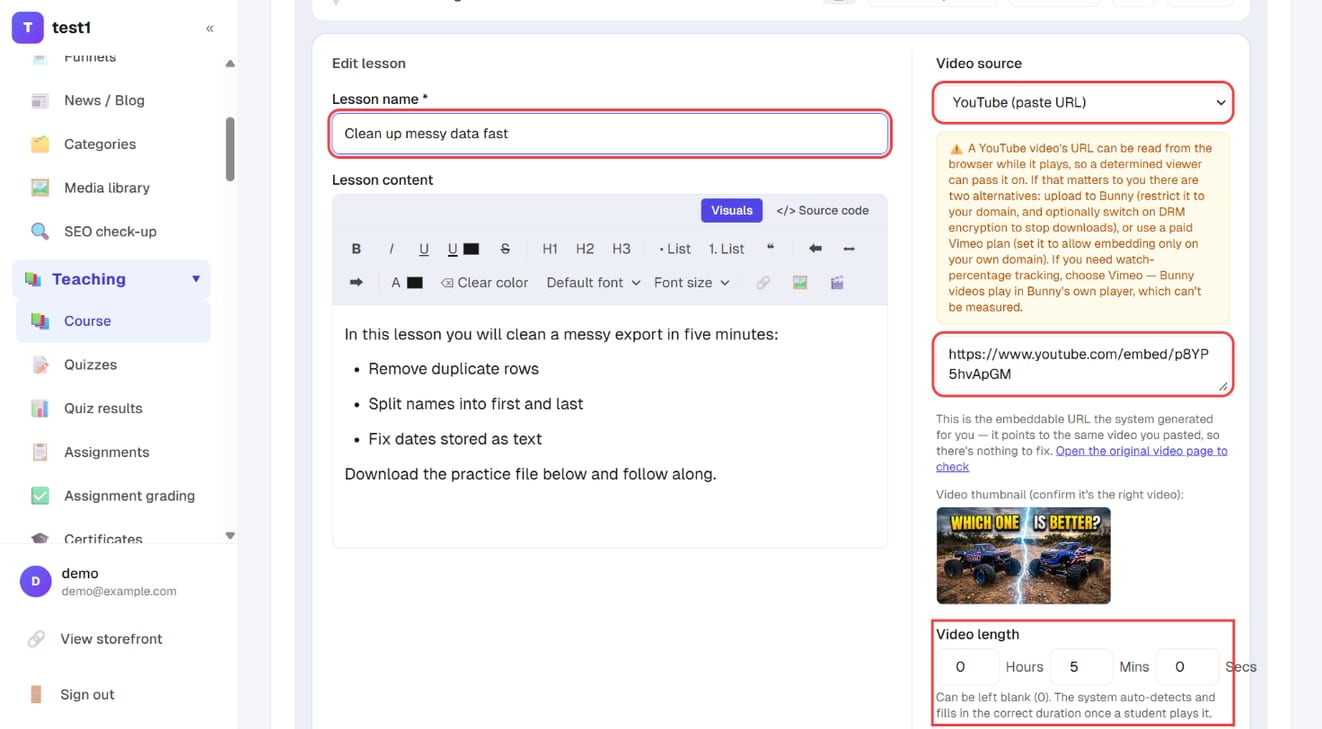
💡 Worried about your videos leaking? Use Bunny (restrict it to your domain, optionally with DRM to stop downloads) or a paid Vimeo plan (allow embedding only on your domain). A YouTube URL can be read from the browser while it plays. Bunny and Cloudflare Stream need your own account under "Settings → Video settings" first — see "Video & media".
The player has a built-in dynamic watermark (the student's email and the site name rotate around the screen, including in fullscreen), which takes away much of the incentive to record and leak your content.
Step 8: Attachments, preview and publishing, then save
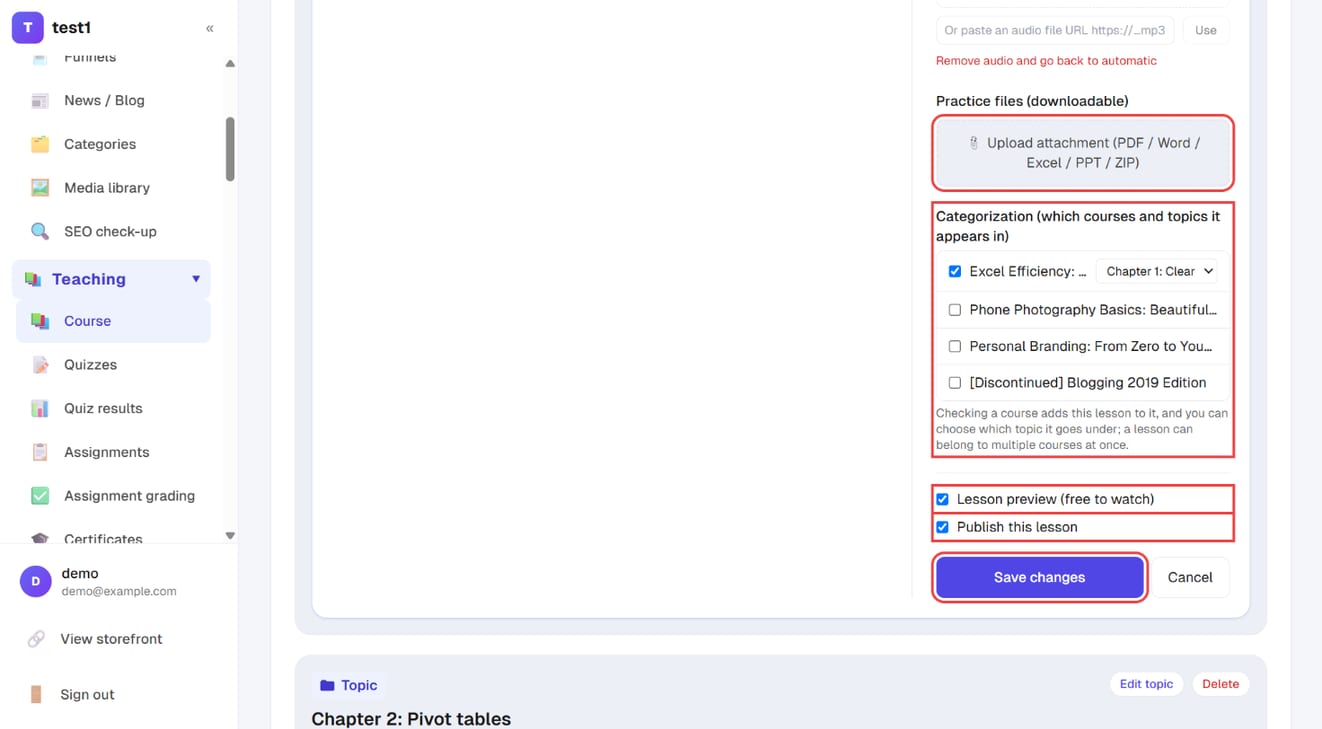
Scroll down the editor:
- Practice files: click "Upload attachment" to add PDF, Word, Excel, PPT or ZIP files for students to download
- Categorization: which courses (and which topic in each) this lesson appears in — a lesson can belong to several courses at once
- Tick "Lesson preview (free to watch)" and "Publish this lesson" as needed, then click "Save changes"
Step 9: Preview, then publish the course
"👁️ Preview" at the top right of the Topics & Lessons page shows exactly what students will see — that link works only for you. When you're happy, go back to the course settings, tick "Publish now" and save. The course appears on your site straight away.
FAQ
I can't delete a course. A course with purchase records can't be deleted, to keep your financial records intact. Use "Discontinued" or unpublish it instead.
A student says they can't see the course. Check in order: is the course published → is the lesson's "Publish this lesson" ticked → is the student on the course's student list → has their viewing period expired?
I want students to go through lessons in order. Tick "Sequential learning" in the course settings. Students then have to finish the video, pass the lesson's quiz and submit its assignment before the next lesson unlocks.
Next up
- Payment setup: so the course can actually take money
- Students & orders: add students manually, look up orders
- Quizzes & assignments